While many writers out there love Scrivener and other programs, I like to stick to the familiar confines of Microsoft Word. In screenwriting, I’ve been burned by countless writing programs that use proprietary formats or depend on the cloud and an internet connection. With Word I can keep saves safely in my own folders, confident that I can open the doc in a decade or two. Unfortunately, navigating a gigantic document in Word can be an absolute bear. Never fear, Word actually has a very well-hidden feature that will make your novel, non-fiction, or memoir-writing life immeasurably easier.
You can use Word’s relatively hidden outline tools to create an index of chapter headings, then use these headings to navigate the document. If you use Word’s endlessly confusing paragraph/header options, Word will also automatically create an outline of sorts.
Here’s how to create your own simple outline, modify the one that exists, or change it as you go.
Note: I created these screenshots on Microsoft Word for Windows with the most recent version as of September 2019. This technique works on Word for Mac, as well as older versions of Word. The buttons might look slightly different, but everything should still be there.
Step 1: Click on the View tab.
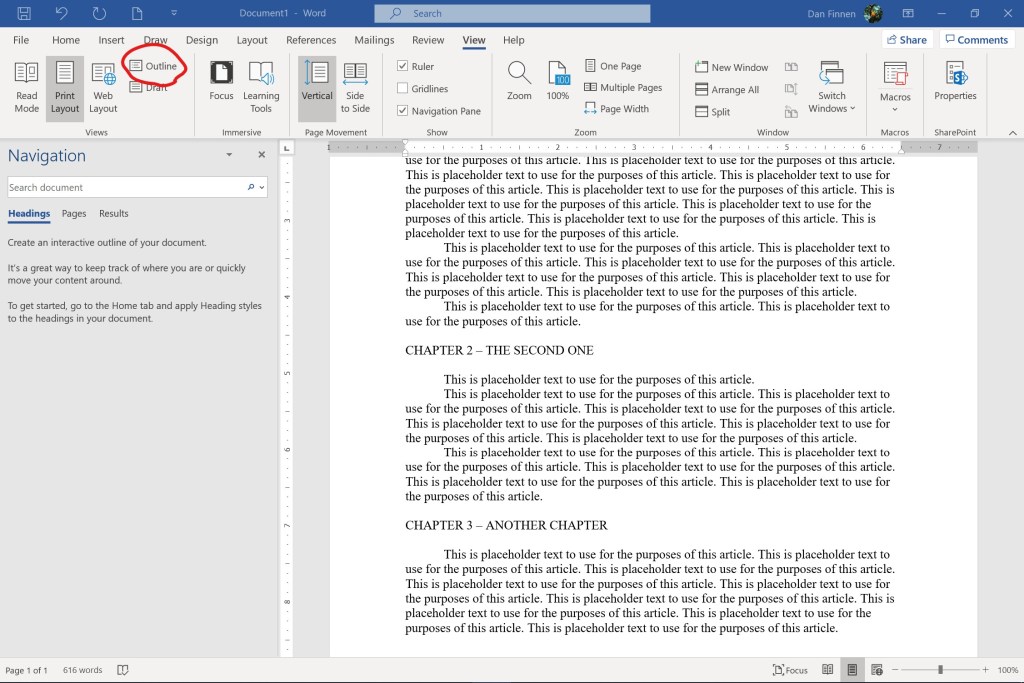
Step 2: Open the navigation pane by checking the box in the ribbon (the bar on the top of the screen). Then, in the navigation pane select ‘Headings.’ In older versions of Word, pages or search often appears by default. This navigation pane is going to be your new best friend, and it is going to act as your table of contents/index.
Step 3: Right now, your headings may be empty, as it is in the above screenshot. Or perhaps it is full of headings, but totally chaotic. How do you update it? Go back to the View tab in the ribbon and select Outline view. Don’t panic – outline view may change how your document looks temporarily. Don’t worry though, it’s just while we’re in that mode.
Step 4: Highlight a chapter header. Then, in the ribbon, click on the drop down menu circled in the above left portion of the screen, and select ‘Level 1.’ This drop down menu features different ‘levels,’ going from Level 1 to Level 2 all the way to Body Text. If you’re getting nuts, you can use all the various levels to create sub-chapters, but I find it far easier to stick to two simple levels. I make all chapter headings Level 1, and I make everything else Body Text. When you are successful, the chapter heading will appear in the navigation pane.
Step 5: As I mentioned, body text might accidentally make it into the headings. Simply highlight the offending text and set it to ‘Body Text.’ It will disappear from the navigation pane.
Step 6: When you’re done, close the outline view to get back to your normal view of Word. Outline view ignores formatting, so everything will look normal again when you close out of it.
Step 7: Now you can click on the chapter headings to quickly bounce around your document! If the navigation pane disappears or is closed, you can always open it back up under the view tab. In the document you can erase and change chapter titles all you want, and it’ll automatically update in the headings tab.
Occasionally making something a header messes with font or spacing, but you can safely change it back to however you want manually.
As I mentioned earlier, this ties in a bit with Word’s arcane ‘Styles,’ so if you’re an advanced user, you can set up a header style that automatically elevates a line to Level 1. If you don’t know what any of that means, you can safely ignore it.
This is a great tool for getting around your manuscript, especially during the revision process. It also helps me see the novel from a high level without having to manually create an outline.
Good luck and happy writing!


You must be logged in to post a comment.